| 7.1 | Realms and Information Bases |
| 7.2 | Gated and Zebra |
| 7.3 | Rules and Dynamic Structure |
| 7.4 | Summary |
Considering the methods for applying dynamic routing to Policy Routing brings up several points of contention. The obvious points regard how to utilize and propagate routing structures that are based on more than the traditional destination-based routing. The more subtle points deal with the actual intricate structures within the implementations of various dynamic routing protocols.
To this end you need to first consider how the actual routing engines differ in the location of the structures. To illustrate this you need to first consider how the various parts of the routing engine are distributed within Linux as opposed to a hardware-based device such as a Cisco router. Then you need to consider the actual implementations of the dynamic routing protocols themselves as evidenced by the available source code.
With this understanding you can then begin to implement the uses of both the dynamic protocols and the Policy Routing structure. The interactions between these systems are mostly within the rules and tables used to structure the information. As these mechanisms progress in use there will hopefully be more interactions possible within the greater Internet itself. But that is another subject entirely.
7.1 Realms and Information Bases
To start with you need to consider how an actual routing engine works. Up to this point you only considered the Routing Policy Database (RPDB) as containing the state of the routing, more particularly the Policy Routing, structure. But this structure has several components.
Recalling the discussion of the RPDB from Chapter 3, the concept of the actual Routing Information Base (RIB) describes what you would call a routing structure. This RIB consists of all the elements necessary to describe how to propagate a packet based on the destination address. It contains many items of information including such details as the interface, MTU, nexthop router, TOS tag, and other information that may be needed to forward the packet. In most routers this is the complete routing table itself.
When you begin to think in terms of Policy Routing structures, especially when you consider the independent uses of the various Triad members, you can see that this single amorphous RIB itself is too large and unwieldy to use as a single entity. Considering that the core concept of routing is to send packets to the appropriate destination, most of the mass of information becomes extraneous and irrelevant. Except when you need to actually make decisions based on those additional items of information. So what if you were to consider splitting the RIB into a database of information and a simple routing mechanism?
Now you are looking at the fundamental change implemented in the RPDB: the concept of the RIB as a split entity where you have the information database and the Forwarding Information Base (FIB). The information contained in the information base can be used to influence and select from the paths coded into the FIB. Think again of the use of the u32 classifier from Chapter 6. You can use any binary information (information base) to determine what TOS tag to set. The TOS tag then selects the route to use (FIB).
It is this divorce of the information from the forwarding that gives Policy Routing power and flexibility. In either extreme, from using all of the information to traditional destination-only routing, the selection mechanism based on the information database is independent of the forwarding mechanism in the FIB. And by establishing that functionality throughout the spectrum between those extremes, Policy Routing can provide all of the uses both in today's Internet and in tomorrow's.
Splitting up these functions makes sense when you consider the complexity driven by routing structures in use. But when you need to think about a complex routing structure, the sheer enormity of the routes that may be present can quickly overwhelm you. Step back and consider what it is that you really want to know.
Within any given complex routing environment there are typically several groupings to consider. These are "meta-routes" that describe larger scale destination groups. The wording used in the ip utility is realm. A realm is best considered as defining a set of routes as selected by human logic. You are not selecting these routes for any network protocol level logic structure, but in order to classify them for your own understanding.
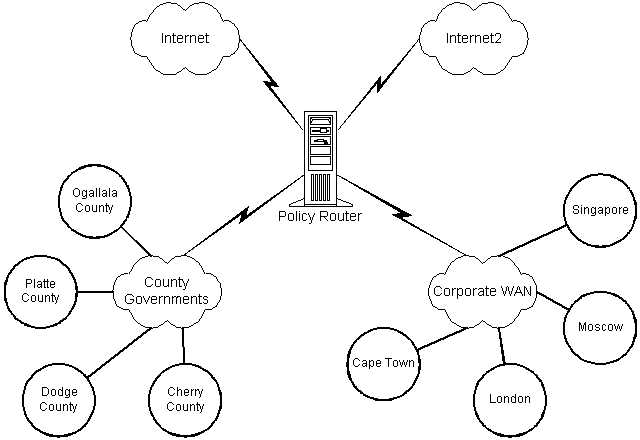
The best way to visualize this is to consider a simple example (figure 7.1.1). Suppose you have a router that has four interfaces. One is the primary connection from the Internet, one is the connection from the Internet2 project, one is to your corporate WAN, and the last one is to the local government. You know that your corporate WAN spans three continents when you factor in the vendors and customers who are also connected. The local government is interconnected with all the other local governments throughout your state, which includes some 750 individual government entities. Your boss just came down and asked how much actual bandwidth is being used from local governments to Internet2. What is your answer?
You know that you have OSPF running on the corporate WAN with your router providing the connection to your defined stub area within the corporate OSPF scheme. The link to the local government defines a different OSPF stub area within the state's OSPF routing scheme. You also have independent Border Gateway Protocol (BGP) peerages running on each Internet connection. All of these instances dump into different routing tables and then you have a whole set of rules for implementing your Policy Routing. But you know you can define a realm whose source scope is the local government OSPF area and whose destination scope is the Internet2 BGP peer. Then you simply can issue a command to look at the traffic amounts for that realm.
With this example in mind you should consider what Alexey Kuznetsov has to say about the implementation of realms in the IPROUTE2 utility suite. Remember that the IPROUTE2 suite includes both the ip utility and the tc utility.
7.1.2 rtacct Route Realms and Policy Propagation
On routers using OSPF ASE (Autonomous System External) or especially the BGP protocol, the routing tables may be huge. If you want to classify or account for the packets per route, you will have to keep lots of information. Even worse, if you want to distinguish the packets not only by their destinations but also by their sources, the task presents a quadratic complexity, and its solution is physically impossible.
One approach for propagating the policy from routing protocols to the forwarding engine has been proposed. Essentially, Cisco Policy Propagation via BGP is based on the fact that dedicated routers have the entire RIB (Routing Information Base) close to the forwarding engine so that Policy Routing rules can check all the route attributes, including ASPATH (Autonomous System PATH) information and community strings.
Within the Linux architecture, where we have a split RIB as maintained by a user-level daemon and the kernel-based FIB (Forwarding Information Base), we cannot allow such a simplistic approach.
Fortunately, there exists another solution that allows an even more flexible policy with rich semantics. Routes can be clustered together in user space based on their attributes. For instance, a BGP router knows the route ASPATH or its community, whereas an OSPF router knows the route tag or its area. A network administrator adding routes manually knows the nature of those routes. Providing that the number of such aggregates, which we call realms, is low, the task of full classification both by source and destination becomes quite manageable.
So each route may be assigned to a realm. It is assumed that this identification is made by a routing daemon, but static routes may also be assigned manually through ip route.
Currently there exists a patch to gated, allowing it to classify routes to realms over all the set of policy rules. See the later section, "gated and Zebra," for more information. This classification is implemented within gated by prefix, ASPATH, origin, tag, and so on.
To facilitate this construction in the case when the routing daemon is not aware of realms, missing realms may be completed with routing policy rules.
For each packet, the kernel calculates the tuple of realms (source realm and destination realm) using the following algorithm:
| 1. | If a route has a realm, the destination realm of the packet is set to it. |
| 2. | If a rule has a source realm, the source realm of the packet is set to it. |
| 3. | If the destination realm was not obtained from route, and the rule has a destination realm, set the destination realm from rule. |
| 4. | If at least one of the realms is still unknown, the kernel finds a reversed route to the source of the packet. |
| 5. | If the source realm is still unknown, get it from a reversed route. |
| 6. | If one of the realms is still unknown, swap realms of reversed routes and apply step 2 again. |
After this procedure is completed, we know what realm the packet arrived from and the realm where it is going. If any of the realms is unknown, it is initialized to zero (or realm unknown).
The main application of realms is in conjunction with the tc route classifier, where they are used to help assign packets to traffic classes for accounting, policing, and scheduling them according to the classification.
A much simpler but still very useful application is packet path accounting by realms. The kernel gathers a packet statistics summary that can be viewed with the rtacct utility.
kuznet@amber~$ rtacct russia
Realm BytesTo PktsTo BytesFrom PktsFrom
russia 20576778 169176 47080168 153805
This output shows that this router has received 153,805 packets from realm russia and forwarded 169,176 packets to russia. The realm russia consists of routes with ASPATHs not leaving russia.
Note that locally originated packets are not accounted here, since rtacct shows ingoing packets only. Using the route classifier, you can get even more detailed accounting information about outgoing packets, optionally summarizing traffic not only by source or destination but by any pair of source and destination realms.
The important point is that the classification of the routes into bundles can be done by any of the associated metadata for the route. This metadata can be the area for OSPF, the community for BGP, or simply the source address from a rule. This classification into realms follows the logic of the administrator who set up the router. As you saw in the preceding example of accounting, the realm russia is defined by the administrator as the set of all routes whose ASPATH membership does not leave russia.
7.2 Gated and Zebra
This discussion of the methods of classification of routes into realms depends on the cooperation of the dynamic routing utility. In UNIX, all dynamic routing that was not simple RIP was traditionally done by the gated daemon. The gated daemon handles all types of routing. The protocol listing includes OSPF, BGP, RIP, HELLO, STATIC, ISIS, and methods of importing and exporting selected sets of information from one protocol to another.
Since the gated daemon was handed off to the MERIT consortium things have changed somewhat. The source code is no longer freely available and the license has changed to academic and non-commercial use only. Now gated has been spun off into a corporation, which will provide a commercial version for sale. The source code to the older versions is still available, however, and version 3.5.10 with patches by Alexey Kuznetsov is the one used with the Linux RPDB.
There is also a new source for routing daemons that has full GPL source code. This is the Zebra project based at http://www.zebra.org. Zebra pursues the concept of independent routing daemons for each protocol. These are all tied into a core zebra daemon, which actually manipulates the FIB inside the kernel. This setup provides a good analogy for the split between the Routing Information such as is provided by a routing protocol and the FIB, which does the actual forwarding action.
You will want to consider both of these daemons. The gated daemon is stable and works quite well. The zebra suite is rapidly evolving and represents the likely face of dynamic routing in the future.
7.2.1 The gated Utility
The gated source that you will use is an older one, 3.5.10. Under Linux you will need to patch it to run under glibc 2.1 and to run with the ip utility. The patched version is on the CD and available from the Web site. For now I will assume that you have obtained the patched source and compiled it.
The most difficult part of getting gated to work is setting up the configuration file. The are a few quirks that you should know about. First of all, the order in which the objects are specified in the configuration file are absolute. If you do not have them in the correct order and list only the ones that are compiled into the gated binary, you get a lot of complaints about parse errors and statements out of order. The second most common problem is forgetting a semicolon for terminating lines. Semicolons are also required for terminating braces. See the examples.
The best way to put together a config file is to get one that works from someone else and then carefully modify it. Otherwise go slowly and set up the sections one by one and test each time. Thankfully, the gated daemon itself can be called with a command-line option (-C) to check the config file and also one to specify the file (-f conffilename). So, you can at least verify that your syntax is correct.
You decide that you want to run OSPF on your corporate network. In order to see how to set up gated, you decide to test it first by running it on a single connected machine. You know that the routers are already running OSPF under area 0.0.0.0. This area is usually referred to as the backbone area. So you set up the following gated.conf file:
routerid 192.168.1.1;
ospf yes {defaults {ospfarea backbone;}; };
This simply tells your system to run OSPF with all the standard defaults and join area backbone. Note that the routerid must correspond with an interface on the system and that that interface must be running when you start gated. Also note carefully where and how the semicolons are placed.
Now you simply run gated from the command line. To check on the operation you look at your main routing table with ip route list:
127.0.0.1 dev lo proto gated/conn scope host
192.168.1.0/24 dev eth0 proto gated/conn scope link src 192.168.1.1
Note that your default route that you knew you had entered earlier is gone. Also, the routes to loopback and the local ethernet are now protocol gated/conn. If you look in /etc/iproute2/rt_protos you will see that this is protocol 248. But you do not see anything from the OSPF yet. So you wait a few minutes and look again. Now you see the routes that are on some of the routers:
127.0.0.1 dev lo proto gated/conn scope host
192.168.1.0/24 dev eth0 proto gated/conn scope link src 192.168.1.1
128.1.1.0/24 via 192.168.1.2 dev eth0 proto gated/ospf
128.1.2.0/24 via 192.168.1.4 dev eth0 proto gated/ospfase
You note that one of the routers is reporting a directly learned route. It is the 192.168.1.2 router and it is telling your machine about a route it has to 128.1.1.0/24. You know it is directly connected to that network. You also see that router 192.168.1.4 is reporting a route that it has imported from some other protocol (gated/ospfase). You happen to know that that is a static route on that router and that that static route is all it is supposed to report via OSPF. So all is working well.
Now you know that you have several areas in your network. So you decide to quickly set up a multi-area configuration to see how it works. The machine you use has two ethernet interfaces, one of which is in the backbone and one of which is in area 172.16.1.0. The interfaces are 192.168.1.1/24 and 172.16.1.1/24. So you generate the following configuration:
routerid 192.168.1.1;
ospf yes {
area 172.16.1.0 {
authtype none;
networks {
172.16.1.0 mask 255.255.255.0;
};
interface 172.16.1.1
cost 2 {
priority 1;
};
};
backbone {
authtype none;
interface 192.168.1.1
cost 1 {
priority 1;
};
};
};
When you fire it up and look at your routing tables you see the same routes with the addition of the local connection for 172.16.1.0/24. This is puzzling because you see no difference with the exception of the locally connected area. So you start looking for a utility that will give you the information on the OSPF areas and what is going on with the dynamic routing.
You find out that you can specify a log file for gated within the configuration file. Additionally for OSPF there is an ospf_monitor utility that enables you to talk with your OSPF routers all throughout your network. Since your gated seems to be running fine, you decide to try the ospf_monitor utility.
Upon reading the documentation you need to create a database file with the IP addresses and names of the various OSPF routers along with the authentication type if authentication is used. Since at the moment you are not using authentication, you decide to quickly create a simple file named ospf.db located in the same directory as ospf_monitor, which contains the following text:
192.168.1.1 mygated
192.168.1.254 core
This file lists both your local gated router as well as the core OSPF router. And since the names are only used to identify the device to you, you can use names that make sense.
Now that you have the file created you run the ospf_monitor utility. This utility takes the name of the database file on the command line. It has its own set of commands that can be seen by entering a ? once you are in the utility. The initial start and commands look like the following:
root# ospf_monitor ospf.db
listening on 0.0.0.0.1026
[ 1 ] dest command params > ?
Local commands:
?: help
?R: remote command information
d: show configured destinations
h: show history
x: exit
@ <remote command>: use last destination
@<dest index> <remote command>: use configured destination
F <filename>: write monitor information to filename
S: write monitor information to stdout (default)
[ 2 ] dest command params > ?R
Remote-commands:
a <area id> <type> <ls id> <adv rtr>: show link state advertisement
c: show cumulative log
e: show cumulative errors
l: <retrans> dump lsdb (except for ASEs)
A: <retrans> dump ASEs
W: <retrans> dump ASEs with LSID's
v: dump all verticies
o: print ospf routing table
I: show interfaces
h: show next hops
N <r>: show neighbors - if r is set will print retrans lst
[ 3 ] dest command params >
You note that the commands are sequentially numbered and that issuing commands is divided into local and remote. Since you know the order in which you input lines into your database file, you know that the dest index is for issuing remote commands. So you decide to look at your local OSPF information:
[ 3 ] dest command params > @1 o
remote-command <o> sent to 192.168.1.1
Source <<192.168.1.1 mygated>>
AS Border Routes:
Router Cost AdvRouter NextHop(s)
----------------------------------------------------
Area 0.0.0.0:
192.168.1.1 0 192.168.1.1
192.168.1.254 1 192.168.1.254 192.168.1.254
Area 172.16.1:
192.168.1.1 0 192.168.1.1
Total AS Border routes: 3
Area Border Routes:
Router Cost AdvRouter NextHop(s)
----------------------------------------------------
Area 0.0.0.0:
192.168.1.1 0 192.168.1.1
Area 172.16.1:
192.168.1.1 0 192.168.1.1
Total Area Border Routes: 2
Summary AS Border Routes:
Router Cost AdvRouter NextHop(s)
---------------------------------------------------
Networks:
Destination Area Cost Type NextHop AdvRouter
----------------------------------------------------------------------------
192.168.1 0.0.0.0 1 Net 192.168.1.1 192.168.1.1
ASEs:
Destination Cost E Tag NextHop AdvRouter
-----------------------------------------------------------------------------
0.0.0.0 2 2 3 192.168.3.254 192.168.1.254
Total nets: 1
Intra Area: 1 Inter Area: 0 ASE: 1
done
[ 4 ] dest command params >
Here you see the details of all of the areas that you have configured on your router. You can also look at any of the other OSPF routers running as long as you enter them into the ospf.db file. This is a good tool for troubleshooting an OSPF network, especially when you do not have physical access to the other routers.
Note that gated itself can participate in many types of dynamic protocols. All of these protocols may be entered into the configuration file along with the appropriate parameters. In this case you only bothered with your OSPF network. But you can have the same machine participate in BGP, RIP v1/v2, and also the newer IPv6 versions of these protocols.
"Route Weights and Selectors"
If you are familiar with other
routers, such as Cisco or Bay or Proteon, and have run multiple
dynamic routing protocols on them, such as OSPF and RIP and BGP for
example, then you may be wondering about how Linux deals with such
multiple routing structures. Remember that you can think of Linux as
having two modes of routing - the traditional style and Policy
Routing. While Policy Routing does provide for backwards
compatibility for much of traditional routing the use of multiple
dynamic routing protocols is one area where you have choices in your
use.
Consider the concept that is
employed by most modern routers when dealing with multiple routes to
the same destination as learned from different routing protocols.
Under traditional routing, and indeed in IPv4 routing in general, you
only want one route to any given destination to be used. If you learn
of a route to the same destination from two different protocols which
one do you use? To solve this problem there is the concept of
"believability" or weighting that is applied to the inputs
from the protocols. In a Cisco or Proteon router this is referred to
as the Administrative Distance assigned to the routes from the given
protocol. This Administrative Distance number provides a method of
selecting the most "believable" route from several
presented. For example a static route has an Administrative Distance
of 1 while an OSPF route to the same destination would have an
Administrative Distance of 50 thus the static route would be selected
as "best". In most cases the Administrative Distance number
assigned to any protocol can be manually defined or changed in the
configuration. The important point is that this mechanism ensures
that there is only one used route to the destination with all the
other routes either becoming backups or standbys or simply being
dropped.
Now consider that in Linux there are
two (2) different basic cases of multiple routes to the same
destination.
1. . All routes on the system are
located in one table.
2. . Each group of routes is in an
independant routing table.
In Linux the traditional routing
default occurs when you use the main routing table alone. Under this
situation (Case #1) the mechanism of Administrative Distance or
weighting is enforced using specified default weights within the
RPDB. See the source for details on the various weights.
The really key part is that with the
RPDB you do not have to use only one routing table! In the case, as
illustrated later in this Chapter, where you allow the specific
dynamic protocol to use an independant routing table (Case #2)then
you control the route selection with rules. You can consider this as
providing the Administrative Distance through the rule mechanism. So
in Linux you can have all of the routes from all of the protocols
available and then use the rules to select which route you want to
use.
Combine this facility of multiple
routing tables for multiple routing protocols with the fact that you
may have multiple routes to the same destination in the same table as
long as the TOS for the route is different and you have a true
multitude of ways to route a packet. Indeed
you can even change the "believability" of direct and
static routes using this mechanism. So you can use all the routes
provided by all of the protocols if you want to without ever needing
to have one override the other unless you wish.
In summary, Linux defaults to using
a configurable Administrative Distance concept when using a single
routing table. Multiple routing tables and the use of TOS tagged
routes allow you to completely override the selection of only one
"believable" route and use whatever routes you want from
whatever protocols you want. Including overriding static and local
routes if you wish.
7.2.2 The Zebra Routing Suite
For now you are interested in how the newer Zebra dynamic routing suite works. To start working with it, you obtain the newest source and compile it for your platform. The best way to get the latest code is to use the cvs repository. Check out http://www.zebra.org for details. In this case you instead go get the latest code as a tarball. The version you will use is 0.89a. This vertsion is on the CD and in the PakSecured distribution included on the CD.
Once the Zebra suite is compiled you find that there are several executables and related configuration files. Since Zebra consists of independent executables for each routing protocol, you can run any set of the protocols. Each protocol has its own configuration file that sets the parameters for the protocol.
The core daemon is zebra. It has the master configuration for all of the interfaces and system static routes. This configuration tells the other daemons which interfaces are available and performs the actual interfacing to the FIB. Each of the protocol daemons maintains a RIB unique to the protocol. This is a very nice implementation of the split between the Routing Information and the FIB as implemented in Linux itself.
One interesting part about Zebra is that the entire interface structure is modeled after the Cisco IOS command line. This makes it quite simple to manage for those who have been exposed to the Cisco style interface. Each daemon will listen on a known port for telnet connections. There is a user-mode interface that allows viewing the routing tables and configurations, and an enable mode that allows setting parameters.
For now you want to explore how Zebra will work within your OSPF network. Returning to the setups worked through in testing gated, you start the same way with a single interface into the network. You want to set up OSPF for listening only for now.
First, you need to configure the core zebra daemon to know about your interfaces. Remembering how your static route disappeared in the first gated test (you ran it earlier in the "gated" section of this chapter)) you decide to make sure that the static route is entered into the system. Since the zebra daemon is responsible for interfaces and static routes, you create the following zebra.conf configuration file, by default located in /usr/local/etc:
! -*- zebra -*-
!
!zebra zebra.ospf.1.0 configuration file
!
hostname myzebra
password zebra
enable password zebra
!
interface eth0
ip address 192.168.1.1/24
!
! Static default route
!
ip route 0.0.0.0/0 192.168.1.254
!
log file /tmp/zebra.log
Then you can just run the zebra daemon. Once it is running you can check your routing table with ip route list to see if there are any differences:
192.168.3.0/24 dev eth0 proto kernel scope link src 192.168.3.13
default via 192.168.3.254 dev eth0 proto zebra
Note that the default route is coded as from proto zebra. As you recall from the gated output, the kernel knows who put the route into the FIB. Note, however, that the actual interface was not recoded into a Zebra interface. This is in contrast to the gated setup where the interfaces ended up coded as proto gated/conn.
Now that you are satisfied that the zebra daemon is working, you leave it running and turn to configuring OSPF. For this you use the Zebra OSPF daemon, ospfd. The configuration file, ospfd.conf located in /usr/local/etc, is similar to the zebra daemon file but with OSPF-specific options. To set up for running on OSPF only you can use a simple configuration file as follows:
! -*- ospf -*-
!
! OSPFd zebra.ospf.1.2 configuration file
!
hostname myzebra
password zebra
enable password zebra
!
router ospf
network 192.168.1.0/24 area 0
!
And then you run the ospfd daemon. It will receive the configuration information about the interfaces from the zebra daemon. So once it is running you check your routing tables again:
192.168.1.0/24 dev eth0 proto kernel scope link src 192.168.1.1
128.1.1.0/24 via 192.168.1.2 dev eth0 proto zebra
128.1.2.0/24 via 192.168.1.4 dev eth0 proto zebra
default via 192.168.1.254 dev eth0 proto zebra
Now you note one of the differences between Zebra and gated. In the same listing from gated you saw that there was a difference both in the name of the protocol and in whether it was a remote route or a remote static route. Here you only see that the protocol is zebra. You do not know if this route was added from a static, as the default route should be coded, or from OSPF, as 128.x.x.x/24 should be.
This is partially due to Alexey's gated patches allowing for different inputs from the gated daemon. Additionally the gated daemon itself tracks internally which route is from which protocol. Remember that gated is monolithic; in other words, everything is in the same package. Since Zebra implements the split between the Routing Information and the FIB, the FIB only sees that the routes were updated from the zebra daemon.
This brings up the question of how to tell which routes came from which protocol within the Zebra suite. Recall that there is a telnet interface to the local daemons for the Zebra suite. To see what the various routes are from you need to connect to the various daemons and look at their individual internal routing tables. This is also where the additional information such as area for OSPF is located.
There are two ways to connect to the daemons for information. The first one is to telnet to the appropriate port for the local daemons individually. In this case zebra is on 2601 by default and ospfd is on 2604. This method requires that you connect to the ospfd for ospf information and zebra for static and interface information. The alternative method is to use the integrated shell. This is vtysh. You can simply execute this command and have access to the various parts of the Zebra suite from one command line. Due to the integration and single point of information, you decide to just use the vtysh. It is simply executed from the command line. Note that there is the full Cisco IOS style execution with a user-level prompt (>) and the enable or superuser prompt (#). See the Zebra documentation for details.
[root@paksecured /root]# /usr/local/bin/vtysh
Hello, this is zebra (version 0.89a)
Copyright 1996-2000 Kunihiro Ishiguro
zebra> en
zebra# sh ip ro
Codes: K - kernel route, C - connected, S - static, R - RIP, O - OSPF,
B - BGP, * - FIB route.
S* 0.0.0.0/0 [1/0] eth0 (3) 192.168.3.254
O 0.0.0.0/0 [110/11] eth0 (3) 192.168.3.254
C* 127.0.0.0/8 lo (1) direct
O* 128.1.1.0/24 [110/11] eth0 (3) 192.168.3.2
O* 128.1.2.0/24 [110/11] eth0 (3) 192.168.3.4
C* 192.168.3.0/24 eth0 (3) direct
zebra#
This gives you the entire routing table as it is seen from the zebra daemon's point of view. Note that there is a difference between the protocols in this routing table. You want to see what the OSPF information is from the ospfd daemon.
zebra# sh ip ospf
OSPF Routing Process, Router ID: 192.168.1.1
Supports only single TOS (TOS0) routes
This implementation conforms to RFC2328
RFC1583 Compatibility flag is disabled
SPF schedule delay 5 secs, Hold time between two SPFs 10 secs
Refresh timer 10 secs
Number of external LSA 3
Number of areas attached to this router: 1
Area ID: 0.0.0.0 (Backbone)
Number of interfaces in this area: Total: 1, Active: 1
Number of fully adjacent neighbors in this area: 1
Area has no authentication
SPF algorithm executed 5 times
Number of LSA 3
zebra# sh ip os nei
Neighbor ID Pri State Dead Time Address \
Interface RXmtL RqstL DBsmL
192.168.1.254 2 Full/DR 00:00:32 192.168.1.254 \
eth0 0 0 0
zebra#
Now you are also curious as to how the interfaces are functioning. So you look at the information for eth0:
zebra# sh int eth0
Interface eth0
index 3 metric 1 mtu 1500 <UP,BROADCAST,RUNNING,MULTICAST>
HWaddr: 00:50:56:8b:03:0d
inet 192.168.1.1/24 broadcast 192.168.1.255
inet6 fe80::250:56ff:fe8b:30d/10
input packets 3297, bytes 1337231, dropped 0, multicast packets 0
input errors 0, length 0, overrun 0, CRC 0, frame 0, fifo 0, missed 0
output packets 1101, bytes 86436, dropped 0
output errors 0, aborted 0, carrier 0, fifo 0, heartbeat 0, window 0
collisions 0
zebra#
This interface gives you all the information you would need to manage and troubleshoot the system.
Security Warning on vtysh
The vtysh interface functions by using the terminal interfaces
to the various daemons. These interfaces are standard telnet
connections and all data is passed in the clear. You can disable the
terminal interfaces by simply remarking out or not including the
password and enable password lines in the configuration files.
However, you then disable the ability of vtysh as well.
From a security standpoint you would only want to run these daemons
with the terminal interfaces if you have taken other precautions to
disable access to those ports.
All of the testing you have performed to this point has shown you how to implement dynamic routing using either gated or the Zebra suite. But you do not know how these dynamic routing suites can interoperate with Policy Routing. You note that to this point all of the routes from either gated or Zebra have been installed into routing table main.
What if you could specify which table to use for the routes? Then you could use the rules to set up special implementations of dynamic routing interfaces. You could run many different versions of dynamic protocols on the same system and have different versions of the routes connecting through your network.
7.3.1 Gated and Multiple Routing Tables
This is where Alexey's patch to gated provides needed extensions. Besides providing for the provisioning of realms it also adds a command-line switch that tells gated what routing table to use. As you recall, gated is monolithic and runs with all interactions providing data to a single routing structure. This command-line switch is simply -T{#}, where you would replace {#} with the number of the routing table to use.
[root@paksecured /root]# ip ro li tab 128
[root@paksecured /root]# /usr/local/sbin/gated -T128
[root@paksecured /root]# ip ro li tab 128
127.0.0.1 dev lo proto gated/conn scope host
192.168.1.0/24 dev eth0 proto gated/conn scope link src 192.168.1.1
128.1.1.0/24 via 192.168.1.2 dev eth0 proto gated/ospf
128.1.2.0/24 via 192.168.1.4 dev eth0 proto gated/ospfase
[root@paksecured /root]#
As you can see, this has placed all of the gated routes into the routing table 128. If you want you can use this fact to assign realms to these routes based solely on the routing table:
[root@paksecured /root]#ip ru add pref 32000 table 128 realms 2/3
Now you have assigned a source realm of 2 and a destination realm of 3 to all routes in table 128. Then all of the standard commands listing realms apply.
7.3.2 Zebra and Multiple Routing Tables
As of the release of Zebra considered herein, 0.89a, only one official usage of assigning a routing table is allowed. This is within the zebra daemon itself and refers specifically only to static routes. You can specify in the configuration file that you want all static routes to be placed within a single table.
Suppose you wanted all of your static routes to be placed into table 129. You would configure the zebra.conf file with the following:
! Static default routes.
! Select table 129 for static routes
table 129
ip route 0.0.0.0/0 192.168.3.254
This would place all the following static routes into table 129. But those are the only routes that would be placed into that table.
Based on several private conversations I have had with other people active on the Zebra mailing list, this type of functionality is being actively considered for both the OSPF and RIP daemons in both IPv4 and IPv6. Recent indications are that this type of command will be available through patches for all of the various daemons.
For example, as of 10/10/2000 an unofficial patch to the bgpd daemon exists that allows bgpd to use a specific route table. This specification is coded as part of an extension to the route-map command. The route-map command allows you to specify filters to be applied to the BGP protocol inputs and outputs. Using this patch you can specify specific ASPATH IDs for matching and assign them to a specific route table. This is a very powerful feature especially when you consider larger multi-connected peerings. Simply being able to separate out the AS by table is a very powerful tool when considering applying Policy Routing structures within such an environment.
7.3.3 gated & zebra & rules = FUN
As it stands now one of the tricks of the trade is to run gated with OSPF only or maybe RIP and OSPF and send it to a single table, such as table 128. Then run zebra to handle the static routes to a table, say 129. Finally, run the bgpd from zebra and tell it to send its information to table 130 and higher.
From there you can assign realms for tracking and use rules to determine which traffic gets routed through which set of connections. Think about modifying the Bounce Table Walking and Tag Routing examples from Chapter 6 using this new set of tables. The possibilities are limitless.
In all of this you must remember that dynamic routing is simply a means to distribute a complex routing table between systems. You need to realize that a dynamic routing protocol, such as OSPF or even BGP, effectively provides a distribution mechanism for a single routing table. Most routers today only possess a single FIB, which is derived from all of the routes presented by the various dynamic protocols. This makes mixing and matching dynamic routing protocols simply not very flexible as you end up discarding duplicate routes according to a predetermined formula.
To get around this single FIB you end up with the concept of weighting which selects the "best" route from the routes presented by the various protocols. By contrast, in the Linux RPDB the FIB actually can be thought of as existing per routing table. You can conceive of each routing table as defining an independent FIB. And the rules then select the FIB to use for the packet. Thus none of the routes are ever filtered out except by direct specification, and all routes from all protocols are available for use. Thus in Linux you, not the FIB, control the route selection.
For example, Linux allows using both BGP and OSPF for the same route. One of the true strengths of the Policy Routing rules is that I can send one packet through BGP and send the next packet through OSPF. Consider the case where you have multiple addresses and networks and you have different route structures for each (remember the discussion in Chapter 2). Especially in larger switched networks you are starting to see use of these types of multiple route structures.
Policy Routing's multiple routing tables enables multiple dynamic routing protocols to be treated just as you treat multiple IP addresses. You can have a different dynamic routing protocol running for different networks on the same physical connection. The ability of each protocol to have its own routing table allows you as the policy administrator to govern and control the structure of the network without having to hassle with which protocol is weightier than the other. This provides you with the best of both worlds.
7.4 Summary
What you have seen in this chapter is how to treat dynamic routing protocols as a means to automatically distribute routing table information. Through the Policy Routing extensions you can assign independent routing tables for use on a per-protocol basis. Then all of the Policy Routing power becomes available to you.
As you saw in Chapter 6, the range and flexibility of Policy Routing can work magic. When you couple with this the ability to segregate and distribute the route Triad element through a dynamic protocol, you effectively extend the reach of a single Policy Routing structure to many devices that cannot perform Policy Routing.
You should now be comfortable setting up and running both gated and the Zebra suite on your system. When you couple this with the skills learned in Chapters 5 and Chapter 6, you start to see the massive scope of networking under Policy Routing. In the next few chapters you will see how NAT is a function of Policy Routing and then you will learn what the future holds for IPv6 and beyond.